
Why (and How) I Built The Blog You’re Reading
Contents
A ~26 min read on Web Development.
- Hello, World!
- $ whoami
- Building a Blog
- The Software Stack
- Serving Content
- Better Content Management
- Handling Code
- Handling Images
- Generating Articles
- Deployment
- Conclusion
Hello, World!
I've always been drawn to blogs where engineers share their journey tackling hard problems or breaking down complicated topics, guiding readers from zero to hero. An all-time favorite of mine is this article, where someone going by the moniker "t0st" brings us down a rabbit hole as they debug a long-standing performance bottleneck in GTA Online, by reverse engineering and profiling the code during runtime. My goal with this blog is to provide similar content, where I tackle a specific topic or challenge, break it down, and guide you through inception to solution. Beyond that, writing articles for this blog provides me ample opportunity to delve deeper into subjects of interest!
$ whoami
I began my programming journey in 2012 when I was 14. Like many kids that age, I was an avid gamer with an addiction to computers (and technology). That passion eventually grew to a point that led me to fantasize about not only playing video games; but also creating my own. After some time, I started out with the (now infamous) Unity Engine, where I slowly grasped C# while learning fundamental programming concepts like statements, expressions, control structures, OOP, and so on. One of my very first IDE experiences was with MonoDevelop, which was installed alongside the engine.
Well… that’s the story I usually tell people. In reality, the official first piece of “finished” software I unleashed upon the world was malware written in Visual Basic for Windows, using Visual Studio. It was a fake cheat for Arma 2: Operation Arrowhead. Essentially, anyone trying to use the cheat software to… well… cheat in the game would get their serial key stolen from their Windows registry and emailed to me. I could then use their serial key to circumvent being banned from the game, impersonate their account, or sell it to someone else. Call it fighting fire with fire.

After years of working on miscellaneous Unity projects, I began to create and sell assets for other developers to use. The most notable and intricate of the bunch: a multiplayer first-person shooter, where the goal is to survive as many waves of zombies as possible, inspired by the Call of Duty zombie mode. I still have showcase videos of that project up on YouTube, where you can find my “programmer art” on full display.
Once I turned 18, I got my first job writing software for a company. I helped them automate IT tasks using PowerShell and built tools with C++ to help streamline their business operations. This is where I started becoming familiar with lower-level concepts like (efficient) memory management and even touched on the basics of Assembly.
Around ~5 years ago I pivoted into full-stack Web Development, which is what I’ve been doing full-time ever since. I currently work at adidas in the .COM Experience department, responsible for the e-commerce website and everything related to it. More specifically, I’m part of the Web Tooling & Frameworks team inside the Experience Core team, responsible for creating and maintaining the building blocks used by other teams, such as APIs, (developer) tools, frameworks, and (CI/CD) pipelines.
Building a Blog
Why build it yourself?
- This web app was already being built as a portfolio/personal website. Having a blog on here was more of an add-on rather than building something standalone.
- Why not Medium or similar? I wanted full technical and creative control over the blog. Plus, I don’t like the idea of hiding article content behind a paywall.
What features do you need?
- An article listing page that displays a list of links to published articles, including snippets like the title, description, and publication date.
- An article display page, where you can view an article’s content, such as headings, paragraphs, images, code snippets, lists, and so on.
- Every article should have an automatically generated anchor link list at the top, and you should be able to jump to anchored sections of the page.
- Each article should provide appropriate metadata to different Social Media platforms, such as setting the correct Open Graph metadata.
Are there any restrictions?
- The blog is content-driven, so it should be statically generated. The plus side is that it makes the article pages trivial to cache and distribute at the edge.
- I wanted a fast and simple content writing experience, without integrating with or depending on any kind of dedicated third-party (headless) CMS.
- Images should be handled and served optimally, providing a variant to the visitor’s device/browser with the most adequate format and resolution.
The Software Stack
Based on the defined requirements and restrictions, combined with previous experience and some research, I ended up with a list of third-party vendors and dependencies that I thought were a good match for this blog — and the website as a whole.
Cloudflare Pages
The reason I chose Cloudflare is that I’ve been relying on their services for years, and I honestly think the quality of their products is currently unmatched in the CDN market. To top it off, Cloudflare also has a generous free tier and a very prominent global network.

Cloudflare Pages, in particular, is incredibly easy to get started with. The only steps required are a connection to your project’s Git repository and a bit of configuration, and you’re good to go. Whenever changes get pushed to the designated “release” branch, a new deployment job gets triggered — Continuous Deployment, without any plumbing!
Qwik
For this project, I was very keen on maximizing performance.
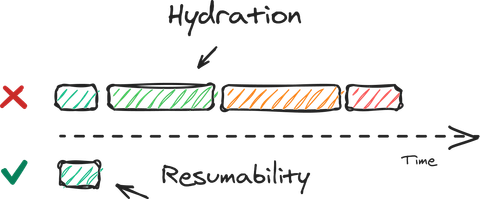
Qwik presented itself as not only a framework primarily focused on performance, but as one that introduced novel solutions to problems created by modern frameworks like React (such as requiring a hydration step client-side to load up the server-side rendered markup into a VDOM object). The idea that I could deliver an instantaneously interactive experience, while also making things that are not immediately required lazy loadable by default, was what sold me on giving this framework a shot.
You might be asking yourself: “Why not use popular frameworks like Next.js or Remix.js?” They address different concerns, like Developer Productivity and Web Standards, respectively. Those are not my focus for this project.
To add fuel to the fire, my hot take is that Next.js has become an incredibly bloated Swiss Army Knife, which contradicts my core belief in lean and efficient software. In the case of Remix.js, I didn’t like the tight coupling between (nested) routes and loaders. I eventually found, after trying to convert a large web application, that its architecture got in my way more often than not. That aside, I do appreciate the reliance on Web Standards and the fact that Remix.js apps work with JavaScript disabled straight out of the box, so I consider it to be a well-intentioned step in the right direction.
MDX
It’s hard to come across an engineer who hasn’t documented something using Markdown — hello, README.md. The main reason is that the syntax is very straightforward and trivial for newcomers to pick up. Therefore, I couldn’t help but think: why not write articles similar to how documentation is written? With MDX, I can take a step further and embed JSX components as part of the Markdown, making it easy to render any kind of content as part of an article, like interactive charts or live demos. To sweeten the pot, Qwik works with MDX right out of the box, requiring no configuration to get it working.
System Fonts
I already knew the design of this website was going to veer towards a blend between The New York Times and Medium — I’ve always had an affinity for the modern-vintage duality coming from serifed fonts. With that in mind, I happened to stumble upon the font stacks from Modern Font Stacks, which provide you with different combinations of similar-looking fonts that are already available on your operating system. Without the need to download the font, it’s no longer necessary to deal with common loading drawbacks such as FOUT, FOIT, CLS, or optimization techniques like subsetting. In the end, I achieved the best of both worlds with the Transitional font stack: a website experience that feels instantaneous, plus the vintage feel and look of a serifed typeface!
CSS Normalization
I’m very much a do-it-yourself type of engineer. However, CSS normalization is one of the usual exceptions I make since, in my view, it’s mindless plumbing. I don’t have the time nor enthusiasm to figure out (and keep track of) the style rendering intricacies of each browser vendor, the difference between different versions, and so on… So, to make things extremely simple, I decided to go with modern-normalize, which does all this work for us. It’s worth noting that this should not be confused with a CSS reset.
Serving Content
So, at this point, we have everything we need: a way to serve the website in a distributed manner, a stack to build it with, and a way to define content. However, that last bit is still a bit unclear… we can define content, but how does it get served?
The /articles/{name} endpoint
Qwik, just like Next.js and Remix.js, uses directory-based routing. This means that the routes of your pages are defined based on the hierarchy in which they’re organized, including the names of each parent directory and the name of the endpoint file itself.
/
|-- index.ts
|
|-- articles/
|   |-- index.ts
|   |-- my-first-article.mdx
|   |-- my-second-article.mdx
|
|-- resume/
    |-- index.ts
The above example would translate into the following routes:
//articles//articles/my-first-article//articles/my-second-article//resume/
So, whenever a new article is written, it’ll be a new MDX file under the articles directory. The bonus of this approach is that since the articles are part of the source code, we’re able to commit them to the repository — giving us access to the entire edit history of every article. If desired, it would be possible to add an article versioning feature, allowing readers to go back-and-forth between revisions.
The /articles endpoint
How individual articles are served is clear to us now. However, if all article data is contained within MDX files, then how would it be possible to get a list of published articles (and some of their data) without hardcoding it somewhere in the project? Well, one way to do this would be to add some metadata at the top of each MDX file (known as Frontmatter) and then define a loader for the listing route — the one that handles /articles requests — to extract that metadata and make it available to the listing page.
---
date: "January 1, 1970"
title: "Article Title"
description: "A snippet describing the article."
---

<!--
... article content ...
-->
To parse that, we’ll define a MDX metadata extraction helper:
import path from "node:path";
import fs from "node:fs/promises";

interface ArticleSummaryProps {
  title: string;
  date: string;
  path: string;
  description: string;
}

async function extractMetadataFromMdxFile(
  basePath: string,
  fileName: string
): Promise<ArticleSummaryProps> {
  // Read the article file contents into memory.
  const filePath = path.join(basePath, fileName, "index.mdx");
  const fileData = await fs.readFile(filePath, { encoding: "utf-8" });

  // Extract the portion at the top with the Frontmatter data.
  const [, metaBlock] = fileData.split("---", 2);
  const fields = metaBlock.split("\n").slice(1, -1);

  const result: Record<string, string> = {};

  // Read in each property as a key-value pair.
  for (const field of fields) {
    const [key, ...values] = field.split(":");
    result[key.trim()] = values.join(":").trim();
  }

  return {
    ...result,
    path: fileName,
  } as ArticleSummaryProps;
}
A more efficient way to parse out the metadata would be to stream in the file contents, beginning at the top of the file. Right now we’re loading the entire file into memory only to extract out the information at the top. Not very efficient, but a quick and dirty way to get us started. With the above, we’re now able to define the following loader:
import { routeLoader$ } from "@builder.io/qwik-city";

/* ... code from previous snippet ... */

export const useArticleSummaries = routeLoader$(
  async (): Promise<Array<ArticleSummaryProps>> => {
    // Read the entities contained inside the articles directory.
    const articlesPath = "./src/routes/articles";
    const entities = await fs.readdir(articlesPath, { withFileTypes: true });

    const results = [];

    for (const entity of entities) {
      // Each article has its own directory.
      if (!entity.isDirectory()) {
        continue;
      }

      // Extract the metadata from the MDX file frontmatter YAML.
      results.push(await extractMetadataFromMdxFile(articlesPath, entity.name));
    }

    // Return the articles sorted by publication date.
    return results.sort((a, b) => {
      const dateA = new Date(a.date);
      const dateB = new Date(b.date);

      return dateB.getTime() - dateA.getTime();
    });
  }
);
And now we just need to access the loaded data in the listing page:
import { component$ } from "@builder.io/qwik";

import { ArticleSummaryList } from "~/components/articles/article-summary-list";
import { CenteredTitle } from "~/components/centered-title";

/* ... code from previous snippet ... */

export default component$(() => {
  const { value: articles } = useArticleSummaries();

  if (!articles.length) {
    return <CenteredTitle title="Oh!" subtitle="There's nothing here yet." />;
  }

  return (
    <>
      <h1>Articles</h1>
      <ArticleSummaryList articles={articles} />
    </>
  );
});
Better Content Management
I realized at one point that writing articles within the IDE itself wouldn't provide the optimal writing experience I had hoped for. Despite gaining flexibility with markdown-to-HTML, writing content directly in the editor felt odd — it felt more like managing source code rather than content creation. Then it occurred to me: I already use Notion for all my note-taking, such as documentation, planning, research, information sharing, and more… why not manage the article content for this blog there too?
- It has an API that I can use to fetch article content from.
- It’s possible to lock pages, which helps avoid accidental post-publish changes.
- The Notion app is installed on all my devices, which makes it easy to work on articles from anywhere at any time, in a very streamlined manner.
Setting up the workflow
Before jumping into writing articles in Notion, it’s important to determine two things:
- how (and where) article content and metadata will be defined; and
- how I’ll get my hands on an API key that has read-only access to that data.
For the first part, I ended up creating a Wiki page titled “Blog” to hold articles as sub-pages under it. The cool thing about a Wiki in Notion is that it’s a Database archetype, allowing you to customize the view (layout, filtering, sorting, etc) and define custom entry properties. I made sure that each article had the following properties:
- Tags (default): used to define the “topic” of an article.
- Snippet: used to define a brief description of the article’s contents.
- Image Cover Alt: used to define alternative text for the cover image.
For the second part I went to Notion’s API documentation sub-site and followed the instructions to create a connection to my Notion workspace and pages:
- In the app, I went to “Settings” and then “Connections.”
- I clicked on the “Develop or manage integrations” link.
- I clicked on “Create new integration” and filled in the required information. I made sure the “Capabilities” of the integration followed the Principle of Least Privilege.
- I then needed to go to the Blog parent page and add the newly created integration as a connection by clicking on the dots on the top right, selecting “Add connections” and selecting the integration.
Now I can use the integration’s secret to access the Blog page and its contents!
Adjusting the existing solution
The previous approach — where we define article content using MDX and serve it as HTML — remains the way to go. The only adjustment needed is how the MDX article files get created: we’ll need a script that does it for us. This script should take care of sending requests to Notion’s API, processing and mapping the content to Markdown, and then storing the results into individual .mdx files inside the routes directory. How the article files are named and organized within the directory will remain the same as before.
For the article listing page, we could keep the previous approach where we set some Frontmatter data at the top of each article MDX file. However, since the required data will be readily available after loading it from Notion, we might as well store it in a more accessible format, such as JSON. The bonus part here is that we can even do the sorting ahead of time, so that we wouldn’t even require a loader anymore — the JSON file can be imported directly, allowing it to be serialized and embedded into the listing page’s HTML. The only downside with this approach is that the more articles I publish, the heavier it becomes… eventually, pagination will become a requirement.
Fetching the content from Notion
To begin, we’ll need a helper that can send requests to Notion, including all the necessary HTTP headers and some logic to handle pagination cursors — until they run out.
// This utility works the same as the Node.js path.join method. Edge runtimes,
// like the one from Cloudflare Pages, have limited backward compatibility
// with the standard libraries of runtimes like Node.js.
import { joinPathNames } from "~/utilities/url";

const { NOTION_TOKEN } = process.env;
const NOTION_VERSION = "2022-06-28";

if (!NOTION_TOKEN) {
  throw new Error("Notion API token is missing.");
}

async function createNotionRequest<ResponseBody>(
  endpoint: string
): Promise<ResponseBody> {
  const url = new URL(joinPathNames("https://api.notion.com/v1", endpoint));

  const headers = {
    "Content-Type": "application/json",
    "Authorization": `Bearer ${NOTION_TOKEN}`,
    "Notion-Version": NOTION_VERSION,
  };

  let response;

  do {
    // If the previous response indicates there's more to fetch,
    // then set the pagination cursor for the next result set.
    if (response?.has_more) {
      url.searchParams.set("start_cursor", response.next_cursor);
    }

    console.debug(`Sending GET request to ${url.toString()}`);

    // Send a request to Notion.
    const currentRequest = await fetch(url, { headers });
    const currentResponse = await currentRequest.json();

    if (response) {
      response = {
        ...currentResponse,
        results: [...response.results, ...currentResponse.results],
      };
    } else {
      response = currentResponse;
    }
  } while (response.has_more);

  return response;
}
With the main request helper defined, I then created a helper for each endpoint I required for the blog use case: /pages/{id} and /blocks/{id}/children.
// This allows us to fetch the information of a page.
async function fetchNotionPage(pageId: string): Promise<NotionPageResponse> {
  return createNotionRequest(`/pages/${pageId}`);
}

// This allows us to fetch the child blocks belonging to a block (like a page).
async function fetchNotionBlockChildren(
  blockId: string
): Promise<NotionBlockChildrenResponse> {
  return createNotionRequest(`/blocks/${blockId}/children`);
}
Mapping everything to Markdown
In Notion, each piece of content is defined as a block. Blocks represent anything from entire pages to smaller pieces of content like paragraphs, lists, images, and so on. Text inside a block is represented using Rich Text, which allows one to define additional information such as if the text is bold, italic, or contains a link. To begin, we need a helper to extract Rich Text inside a block and map them to Markdown.
function getRichTextContentFromBlock(block: NotionBlock) {
  const blockContent = block[block.type] as NotionBlockContents;
  const richTextList = blockContent.rich_text ?? [];

  // Notion sometimes breaks up a block into multiple rich text objects to
  // represent multiple parts of a whole, so we need to stitch it back together.
  return richTextList.reduce(
    (result: string, richText: NotionRichText): string => {
      const { annotations = {} } = richText;
      const { content = "", link } = richText.text ?? {};

      let text = content;

      if (!text) {
        return result;
      }

      if (link) {
        text = `[${text}](${link.url})`;
      }

      // Bold and italic must come after each other, since bold & italic is ***.
      if (annotations.italic) {
        text = ["*", text, "*"].join("");
      }

      if (annotations.bold) {
        text = ["**", text, "**"].join("");
      }

      if (annotations.code) {
        text = ["`", text, "`"].join("");
      }

      return result + text;
    },
    ""
  );
}
Then, we can use getRichTextContentFromBlock to extract the content of each block based on their type. There are two other things we’ll want to gather while going through the block list: an anchor link list based on the defined h2 and h3 headings, and the article word count based on the amount of words from the extracted rich text content.
import {
  getReadTimeInMinutesFromWordCount,
  getWordCount,
} from "~/utilities/text";
import { slugify } from "~/utilities/url";

import { isNextIndexBlockOfType } from "./notion";

/* ... code from previous snippet ... */

function convertBlocksToMarkup(blocks: Array<NotionBlock>): ConvertedMarkup {
  let articleContent = "";
  let anchorLinks = "";

  let wordCount = 0;
  let numberedItemCount = 0;

  for (let index = 0; index < blocks.length; index++) {
    const block = blocks[index];

    let content = "";
    let prefix = "";
    let spacer = "\n\n";

    switch (block.type) {
      case NotionBlockType.PARAGRAPH:
        content = getRichTextContentFromBlock(block);
        wordCount += getWordCount(content);
        break;

      case NotionBlockType.BULLETED_LIST_ITEM:
        prefix = "-";
        content = getRichTextContentFromBlock(block);
        wordCount += getWordCount(content);

        if (
          isNextIndexBlockOfType(
            blocks,
            index,
            NotionBlockType.BULLETED_LIST_ITEM
          )
        ) {
          spacer = "\n";
        }
        break;

      case NotionBlockType.NUMBERED_LIST_ITEM:
        prefix = `${++numberedItemCount}.`;
        content = getRichTextContentFromBlock(block);
        wordCount += getWordCount(content);

        if (
          isNextIndexBlockOfType(
            blocks,
            index,
            NotionBlockType.NUMBERED_LIST_ITEM
          )
        ) {
          spacer = "\n";
        } else {
          numberedItemCount = 0;
        }
        break;

      case NotionBlockType.HEADING_ONE:
        prefix = "#";
        content = getRichTextContentFromBlock(block);
        wordCount += getWordCount(content);
        break;

      case NotionBlockType.HEADING_TWO:
        prefix = "##";
        content = getRichTextContentFromBlock(block);
        wordCount += getWordCount(content);

        content = `[${content}](#${slugify(content)})`;
        anchorLinks += `- ${content}\n`;
        break;

      case NotionBlockType.HEADING_THREE:
        prefix = "###";
        content = getRichTextContentFromBlock(block);
        wordCount += getWordCount(content);

        content = `[${content}](#${slugify(content)})`;
        anchorLinks += `  - ${content}\n`;
        break;

      default:
        throw new Error(`Block type "${block.type}" is not supported.`);
    }

    if (!content.length) {
      continue;
    }

    if (prefix) {
      articleContent += prefix + " " + content + spacer;
    } else {
      articleContent += content + spacer;
    }
  }

  const readTime = getReadTimeInMinutesFromWordCount(wordCount);

  return {
    articleContent,
    anchorLinks,
    readTime,
  };
}
The slugify utility is used to transform text into something that can be used as part of a route pathname. For instance, "Why (and How) I Built The Blog You’re Reading" would be formatted into "why-and-how-i-built-the-blog-youre-reading". This is useful for article routes and anchor heading fragment names.
Handling Code
Converting to Markdown
Code blocks are not too complicated, other than they require a bit more handling for things such as syntax highlighting and automated formatting. To begin, we need a helper to convert a code block into Markdown syntax.
function getCodeContentFromBlock(block: NotionBlock): string {
  const content = block[block.type] as NotionBlockContents;
  const code = content.rich_text?.[0]?.plain_text;

  if (code) {
    return ["```", content.language, "\n", code, "\n", "```"].join("");
  } else {
    return ["```", "", "```"].join("\n");
  }
}
And then a case for handing code block types in the convertBlocksToMarkup helper.
switch (block.type) {
  /* ... other cases ... */
  case NotionBlockType.CODE:
    content = getCodeContentFromBlock(block);
    break;
  /* ... other cases ... */
}
Syntax highlighting
Qwik City comes with built-in support for the rehype plugin, which uses Prism to convert code HTML into something that supports syntax highlighting. The reason I chose Prism over something like Highlight.js is because I wanted to do syntax highlighting completely statically at build time (i.e., with pure HTML & CSS) instead of during runtime using JavaScript. To get started, the first step is to enable rehype syntax highlighting in the main vite.config.ts configuration file.
import { defineConfig } from "vite";
import { qwikVite } from "@builder.io/qwik/optimizer";
import { qwikCity } from "@builder.io/qwik-city/vite";
import tsconfigPaths from "vite-tsconfig-paths";

export default defineConfig(() => {
  return {
    plugins: [
      qwikCity({
        mdxPlugins: {
          remarkGfm: false,
          // Enable syntax highlighting with rehype.
          rehypeSyntaxHighlight: true,
          rehypeAutolinkHeadings: false,
        },
      }),
      qwikVite(),
      tsconfigPaths(),
    ],
  };
});
With the plugin enabled, it was then time to select a theme. I ended up going for one that was inspired by the standard dark theme from VSCode, where I made some minor adjustments to it. With the CSS file being part of the source code, all I had to do was lazy load it in like any other CSS asset (using useStyles$).
import { component$, useStyles$ } from "@builder.io/qwik";

import stylesForLayout from "./layout.css?inline";
import stylesForCodeHighlights from "../../styles/code.css?inline";

export default component$(() => {
  useStyles$(stylesForLayout);
  useStyles$(stylesForCodeHighlights);

  /* ... remaining component ... */
});
The downside to loading it like this (in the layout.tsx for the /articles route) is that it’ll also load for the listing page, where it’s not needed. I can’t conditionally call the hook, so I’ve decided to leave this behind as a caveat — the CSS file is tiny anyway.
Automated formatting
For my day-to-day work I use Prettier to apply automated formatting to everything, so the prettier package was already installed as a development dependency. To begin, I created a module that re-exports its JSON configuration file with corrected typing.
import type { Options } from "prettier";

import prettierConfig from "../../.prettierrc.json";

// The only reason we need to do this rather than import the JSON file
// directly is because there's a mismatch between what's expected by the
// format function options parameter and the JSON contents (the enum
// definition for the "trailingComma" property, basically).
export const PRETTIER_CONFIG = prettierConfig as Options;
I then modified the previous getCodeContentFromBlock implementation to call Prettier’s formatter programmatically (if the code block’s language is supported).
import prettier from "prettier";

import { PRETTIER_CONFIG } from "~/definition/prettier";

async function getCodeContentFromBlock(block: NotionBlock): Promise<string> {
  const content = block[block.type] as NotionBlockContents;
  const code = content.rich_text?.[0]?.plain_text;

  if (!code) {
    return ["```", "", "```"].join("\n");
  }

  // Get information on what Prettier supports.
  const prettierSupportInfo = await prettier.getSupportInfo();

  const { language = "" } = content;
  const supportedLanguages = prettierSupportInfo.languages.map(({ name }) =>
    name.toLowerCase()
  );

  let codeOutput;

  // If the current code block's language is supported, format the code.
  if (supportedLanguages.includes(language)) {
    codeOutput = await prettier.format(code, {
      ...PRETTIER_CONFIG,
      // This print width more or less matches the maximum width
      // of a code block on an article page.
      printWidth: 80,
      parser: language,
    });
  } else {
    codeOutput = code + "\n";
  }

  // We surround the Markdown with an ignore comment for Prettier since
  // later on we'll run Prettier again on the entire MDX file and don't
  // want this snippet to be affected.
  return [
    "{/* prettier-ignore-start */}",
    "\n",
    "```",
    language,
    "\n",
    codeOutput,
    "```",
    "\n",
    "{/* prettier-ignore-end */}",
  ].join("");
}
Since the getCodeContentFromBlock helper now returns a Promise, a tiny adjustment needs to be made in convertBlocksToMarkup to await the result.
switch (block.type) {
  /* ... other cases ... */
  case NotionBlockType.CODE:
    content = await getCodeContentFromBlock(block);
    break;
  /* ... other cases ... */
}
And that’s it! We now have formatted code with syntax highlighting.
Handling Images
My ideal approach to image optimization is one where you upload an original quality image somewhere and a client (e.g., a browser) is able to fetch it through an API, passing in settings as part of the request URL to transform the resolution, quality, compression, and more, in real-time, to something that is ideal for the requesting device.
For instance, if you’re visiting this blog on a mobile device with a small screen, you wouldn’t want to load an image in its original 3000x4000 resolution. That’d be a waste of bandwidth. Instead, you’d be able to request a smaller version (e.g., 300x400), which would load faster without compromising the perceived visual quality.
That’s the essence of how I want to serve images: your device is able to request a variant of an image that best matches your screen resolution and DPR (Device Pixel Ratio).
Why not use a vendor?
You may be surprised by the fact I ended up deciding to build this myself rather than use an existing product such as Cloudflare Images, Cloudinary, or ImageKit. Here’s why:
- Unless it’s rocket science or there’s a tight delivery timeline, you’ll never find me jumping into a product bloated with a bunch of things I don’t need (including the price tag). I like to have just the necessary features, for free, with maximum customizability and control. Plus, it’s fun to build things!
- My goal is to avoid asset duplication and/or management complexity as much as possible. Uploading images directly to Notion, as part of the article content, does exactly that: it keeps things simple and centralized. I don’t want to manage the image assets through some vendor UI or API, and switch back-and-forth.
- Going for a vendor means dealing with cost, tradeoffs, or both. For instance, there are usually restrictions on the size or format for image uploads, and pricing is based on either the bandwidth required to serve the images or on certain features. As someone who does photography as a hobby, being limited to 5MB per image is untenable. I don’t want to deal with creating downscaled duplicates.
- I actually intended on building a custom API for exactly this purpose, so this implementation provides an initial foundation to something that will eventually become its own standalone service. I plan on using the API for not only this site, but also other sites of mine, like my photography portfolio website.
Defining the process
The idea is that we’ll go for something a bit less adaptive or real-time than what I described earlier going into this section. Essentially, the same script that takes care of pulling the content from Notion and generating the article MDX files is what will take care of fetching the images from any image blocks (or the article cover), processing them and storing generated variants inside an assets directory inside the public directory.
With the generated variants being stored in the public assets directory, they’ll get deployed as part of the build and will be publicly accessible. In terms of what the actual variants will be, there are a couple of requirements:
- The primary image format will be AVIF, which is modern, has better compression than other image formats (other than JPEG XL), and has decent browser support.
- As a fallback, we’ll also be using the WebP format, which has more widespread support but not as good compression when compared to AVIF or JPEG XL.
- The variant widths are calculated based on the max width of the article content container, “known” device breakpoints, and DPR multipliers (1x, 2x, 3x).
To help debug and optimize the image variants, I’ll be using the Lighthouse performance report tool built into Google Chrome’s Dev Tools, which gives me useful insights into image performance. Moreover, I also will be making use of a responsive image linting bookmarklet called RespImageLint, which gives me information about the images on the page and if they’re following best practices or have commonly known mistakes.
Generating image variants
To start, we’ll need a helper to fetch the images and parse the data in such a way that facilitates further processing later on. We’ll be using the sharp package to help with that.
async function fetchAndProcessImage(
  url: string,
  purpose = ImagePurpose.OTHER
): Promise<ProcessedImage> {
  // We expect images to be uploaded directly to Notion's S3 bucket. This
  // ensures that the image files don't change or get deleted after it's
  // initially downloaded during a build (or referenced for an article).
  if (!url.startsWith("https://prod-files-secure.s3.us-west-2.amazonaws.com")) {
    throw new Error("Only images from Notion's S3 bucket can be loaded.");
  }

  console.debug(`Sending GET request to ${url}`);

  // Download the image.
  const response = await fetch(url);
  const blob = await response.blob();

  // Parse the image.
  const image = sharp(await blob.arrayBuffer());
  const { format = "unknown", width = 0, height = 0 } = await image.metadata();
  const metadata = { format, width, height };

  // If we're fetching an article cover image, enforce JPEG or PNG since
  // we'll need to use the original files for metadata purposes.
  if (ImagePurpose.ARTICLE_COVER === purpose) {
    switch (format) {
      case ImageFormat.JPEG:
      case ImageFormat.PNG:
        break;

      default:
        throw new Error("Cover images must be either in JPEG or PNG format.");
    }
  }

  let output;
  let willUseOriginal;

  // We don't process SVG or GIF images to create variants, so we make
  // sure we can access the original data necessary to recreate them.
  switch (format) {
    case ImageFormat.SVG:
      willUseOriginal = true;
      output = await blob.text();
      break;

    case ImageFormat.GIF:
      willUseOriginal = true;
      output = Buffer.from(await blob.arrayBuffer());
      break;

    default:
      willUseOriginal = false;
      output = Buffer.from(await blob.arrayBuffer());
      break;
  }

  return { image, metadata, output, willUseOriginal };
}
Notice the two exceptions in the above snippet for SVG and GIF images.
- SVG: this format is represented using vectors and isn’t rasterized, which means it can scale infinitely, since it’s constructed mathematically.
- GIF: this format wasn’t being converted properly by
sharpinto WebP, which supports animations, so I decided to let it fall through (for now).
The next step is to define a helper that can convert a single image into different formats and resized variants.
// This tells us if the script is running as part of a Cloudflare Pages
// deployment or if we're running it elsewhere — like locally.
const IS_CF_BUILD = Boolean(process.env.CF_PAGES);

async function createImageVariants(
  { image: original, metadata }: ProcessedImage,
  format: ImageFormat
): Promise<Array<ProcessedImage>> {
  let image = original.clone();

  // Convert to the target format. We use maximum CPU effort when
  // processing for a deployment (which is slowest) and minimum effort
  // when processing elsewhere (which is fastest).
  switch (format) {
    case ImageFormat.WEBP:
      image = image.webp({
        effort: IS_CF_BUILD ? 6 : 0,
        quality: 80,
        alphaQuality: 100,
        smartSubsample: true,
        nearLossless: true,
      });
      break;

    case ImageFormat.AVIF:
      image = image.avif({
        effort: IS_CF_BUILD ? 9 : 0,
        quality: 80,
        lossless: false,
      });
      break;

    default:
      throw new Error(`Image format '${format}' is not supported.`);
  }

  const variants: Array<ProcessedImage> = [];
  const { width = 0 } = metadata;

  // These width values are based on the max article width, device breakpoints,
  // and different DPR multiplier values + some deduplication.
  for (const resizeWidth of [480, 705, 960, 1410, 1440, 2115]) {
    const targetWidth = resizeWidth < width ? resizeWidth : width;
    const resizedImage = image.resize(targetWidth);

    console.debug(
      `Resizing image from format ${metadata.format}` +
        `to ${format} with width ${targetWidth}...`
    );

    // Process the format and size conversion.
    const { data, info } = await resizedImage.toBuffer({
      resolveWithObject: true,
    });

    const newMetadata = {
      format,
      width: info.width,
      height: info.height,
    };

    variants.push({
      image,
      metadata: newMetadata,
      output: data,
    });

    // If the image is too small to proceed, then stop here.
    if (targetWidth === width) {
      break;
    }
  }

  return variants;
}
We then need another helper to store the variants in the public assets directory. The file name will be the unique SHA-256 hash of the image’s contents.
async function saveImage({
  metadata,
  output,
}: ProcessedImage): Promise<string> {
  const { format, width } = metadata;
  const contentHash = createHash("sha256").update(output).digest("hex");

  const fileName = `${contentHash}-${width}.${format}`;
  const publicPath = `/assets/${fileName}`;

  await writeFile(joinPathNames("./public", publicPath), output);

  return publicPath;
}
And that’s all we need on the fetching, processing, and saving side.
Converting to Markdown
Before we can convert images into markup, we’ll need a helper to extract the content from Notion image blocks.
function getImageContentFromBlock({
  block,
  captionOverride,
}: {
  block: NotionBlock;
  captionOverride?: string;
}): ImageContent {
  const content = block[block.type] as NotionBlockContents;

  if (typeof content.type === "undefined") {
    throw new Error("Image content is missing a content type.");
  }

  const { url } = content[content.type] ?? {};
  const caption = captionOverride ?? content.caption?.[0]?.plain_text;

  if (!url) {
    throw new Error("Image content is missing a URL.");
  } else if (!caption) {
    throw new Error("Image content is missing a caption.");
  }

  const isCaptionHidden = caption.startsWith("(HIDDEN)");
  const captionWithoutTag = isCaptionHidden
    ? caption.slice("(HIDDEN)".length).trim()
    : caption;

  return {
    url,
    caption: {
      isHidden: isCaptionHidden,
      text: captionWithoutTag,
    },
  };
}
Whenever we come across an image with "(HIDDEN)" at the beginning of the caption text, this means we want to include it as part of the image alt attribute, but not visually display it as part of the markup.
Next, we’ll need to be able to create (and serialize) a source set for each image variant. This will be used for the srcset attribute on the img element later on.
async function createSourceSetsFromImageVariants(
  variants: Array<ProcessedImage>
): Promise<Array<ImageSourceSet>> {
  const imageSources = [];

  for (let index = 0; index < variants.length; index++) {
    const variant = variants[index];
    const variantSize = `${variant.metadata.width}w`;
    const variantPath = await saveImage(variant);

    imageSources.push({ size: variantSize, path: variantPath });
  }

  return imageSources;
}

function serializeSourceSet(sourceSet: Array<ImageSourceSet>): string {
  return sourceSet.map(({ path, size }) => [path, size].join(" ")).join(", ");
}
Then, creating the HTML markup for an image is a matter of setting all the required attributes based on if we’re rendering a single image or an image with multiple sources.
function renderImageMarkup({
  image,
  caption,
  publicPath,
  isPriority = false,
  avifSourceSet: avifSources = [],
  webpSourceSet: webpSources = [],
}: {
  image: ProcessedImage;
  caption: ImageCaption;
  publicPath: string;
  isPriority?: boolean;
  avifSourceSet?: Array<ImageSourceSet>;
  webpSourceSet?: Array<ImageSourceSet>;
}): string {
  const { metadata } = image;
  const isSingleImage = avifSources.length + webpSources.length === 0;

  const src = `src="${publicPath}"`;
  const width = `width="${metadata.width}"`;
  const height = `height="${metadata.height}"`;
  const alt = `alt="${caption.text}"`;

  // If the image is a priority, then we want it to block rendering and
  // load eagerly. Otherwise, non-blocking lazy loading is preferred.
  const decoding = `decoding="${isPriority ? "sync" : "async"}"`;
  const loading = `loading="${isPriority ? "eager" : "lazy"}"`;

  const img = `<img ${src} ${width} ${height} ${alt} ${decoding} ${loading} />`;
  const figcaption = caption.isHidden
    ? null
    : `<figcaption>${caption.text}</figcaption>`;

  if (isSingleImage) {
    return ["<figure>", img, figcaption, "</figure>"]
      .filter((value) => value)
      .join("\n");
  }

  const sizes = `sizes="(max-width: 46rem) 90vw, 46rem"`;
  const avifSourceSet = `srcset="${serializeSourceSet(avifSources)}"`;
  const webpSourceSet = `srcset="${serializeSourceSet(webpSources)}"`;

  return [
    "<figure>",
    "<picture>",
    `<source ${sizes} ${avifSourceSet} />`,
    `<source ${sizes} ${webpSourceSet} />`,
    img,
    "</picture>",
    figcaption,
    "</figure>",
  ]
    .filter((value) => value)
    .join("\n");
}
Lastly, we need something that can take in some data about an image and create the markup for us based on if it’s a single image or an image with multiple variants.
async function generateImagesWithMarkup({
  image,
  caption,
  publicPath,
  isPriority = false,
}: {
  image: ProcessedImage;
  caption: ImageCaption;
  publicPath?: string;
  isPriority?: boolean;
}) {
  if (publicPath) {
    return renderImageMarkup({
      image,
      caption,
      publicPath,
      isPriority,
    });
  }

  const avifVariants = await createImageVariants(image, ImageFormat.AVIF);
  const webpVariants = await createImageVariants(image, ImageFormat.WEBP);

  const avifSourceSet = await createSourceSetFromImageVariants(avifVariants);
  const webpSourceSet = await createSourceSetFromImageVariants(webpVariants);

  return renderImageMarkup({
    image,
    caption,
    isPriority,
    avifSourceSet,
    webpSourceSet,
    // We use the smallest WebP variant as fallback.
    publicPath: webpSourceSet[0].path,
  });
}
Bringing it all together, the last bit is a case for converting image block types.
switch (block.type) {
  /* ... other cases ... */
  case NotionBlockType.IMAGE:
    {
      // Fetch and parse the image from the block.
      const imageContent = getImageContentFromBlock({ block });
      const imageData = await fetchAndProcessImage(imageContent.url);

      let publicPath;

      // If we're going to use the original image, save it
      // to the file system.
      if (imageData.willUseOriginal) {
        publicPath = await saveImage(imageData);
      }

      // Generate variants if we haven't already saved the original
      // image. Get the image markup back.
      content = await generateImagesWithMarkup({
        publicPath,
        image: imageData,
        caption: imageContent.caption,
      });
    }
    break;
  /* ... other cases ... */
}
Generating Articles
We now have everything necessary to generate MDX articles through Notion, but where does the magic actually happen? Well, there will be a script for that. Its job will be to fetch content from Notion, process it, and store any relevant output on the file system.
Build time vs runtime
If you’re astute, you might be wondering how I could possibly use native Node.js modules for some of the above snippets (such as fs, path, and crypto) when I also justified writing custom implementations of some of their utility methods due to the backwards compatibility limitations of Cloudflare Pages’ edge runtime.
Well, the secret is that the code in those snippets are run by the script generating the articles, which executes during build time, where the Node.js runtime is available in the CI environment. Once the application is deployed, we’re then stuck with the more limited edge runtime. So long as I don’t use those Node.js modules for any code required during runtime, like any code that handles incoming requests, it’ll work just fine.
This also applies to the process.env references, where we read environment variables related to Notion into memory. Those environment variables are only available during build time, so there is no exposure risk once the built application is deployed to the edge.
Creating article MDX files
To start off, we need to fetch all the published articles from the Blog page.
// Fetch all the article sub-pages from the Blogs parent page.
const articlesPageResponse = await fetchNotionBlockChildren(
  NOTION_ARTICLES_PAGE_ID
);
const articlesPageContents = articlesPageResponse.results;

const articles: Array<Article> = [];

for (let index = 0; index < articlesPageContents.length; index++) {
  const block = articlesPageContents[index];

  // Skip if this child block is not a sub-page.
  if (block.type !== NotionBlockType.CHILD_PAGE) {
    continue;
  }

  const childPageBlock = block as NotionChildPageBlock;
  const { title } = childPageBlock.child_page;

  // Skip articles with titles prefixed with "(WIP)."
  if (title.startsWith("(WIP)")) {
    continue;
  }

  articles.push({
    title,
    id: childPageBlock.id,
    date: new Date(childPageBlock.last_edited_time),
    path: slugify(title),
  });
}
The next step is to process each article one by one, by fetching additional data and converting all the blocks to their markup equivalents.
// Process and generate each article.
for (const { id: articleId, ...articleData } of articles) {
  const page = await fetchNotionPage(articleId);
  const { results: blocks } = await fetchNotionBlockChildren(articleId);
  const { articleContent, anchorLinks, readTime } =
    await convertBlocksToMarkup(blocks);

  /* ... */
}
We also need to process the cover image for the article.
/* ... */

const { cover, properties } = page;
const coverCaption = properties.cover_alt.rich_text[0].plain_text;

const coverImageContent = getImageContentFromBlock({
  // Convert the cover object into a "fake" block so it can be passed in here.
  block: {
    id: "",
    type: NotionBlockType.COVER,
    [NotionBlockType.COVER]: cover,
  },
  captionOverride: coverCaption,
});

// Fetch the cover image.
const coverImageData = await fetchAndProcessImage(
  coverImageContent.url,
  ImagePurpose.ARTICLE_COVER
);

// Save the original file (we need it for the metadata).
const coverImagePublicPath = await saveImage(coverImageData);

// Generate image variants and get the image markup back.
const coverImageMarkup = await generateImagesWithMarkup({
  isPriority: true,
  image: coverImageData,
  caption: coverImageContent.caption,
});

/* ... */
And, finally, the next step is to put everything together. For this I created a template MDX file that contains a bunch of placeholders. It looks like this:
function generateMdxArticlePage({
  pageUrl,
  title,
  description,
  topic,
  date,
  coverImage,
  readTime,
  anchorLinks,
  articleContent,
}: {
  pageUrl: string;
  title: string;
  description: string;
  topic: string;
  date: Date;
  readTime: number;
  anchorLinks: string;
  articleContent: string;
  coverImage: {
    url: string;
    alt: string;
    type: string;
    width: number;
    height: number;
    markup: string;
  };
}) {
  return `
---
title: ${title}
description: "${description}"
author: Daniel van Dijk
opengraph:
  - title: true
  - description: true
  - type: article
  - url: ${pageUrl}
  - article:author: Daniel van Dijk
  - article:published_time: ${date.toISOString()}
  - tag: ${topic}
  - locale: en_US
  - site_name: Daniel van Dijk
  - image: ${coverImage.url}
    image:alt: ${coverImage.alt}
    image:type: ${coverImage.type}
    image:width: ${coverImage.width}
    image:height: ${coverImage.height}
---

export default function Layout({ children: content }) {
  return <article>{content}</article>;
}

${coverImage.markup}

# ${title}

<time dateTime="${date.toISOString()}" role="doc-subtitle">
  ${formatDateAsString(date)}
</time>

---

## Contents

A ~${readTime} min read on ${topic}.

${anchorLinks}

---

${articleContent}
  `;
}
With the article template helper defined, the next step is to bring all the data together and format the resulting MDX file string contents and output that to the src/routes/articles directory.
/* ... */

const { title, date } = articleData;
const topic = properties.tags.multi_select[0].name;

const articleRoute = slugify(title);
const articleDirectory = joinPathNames("./src/routes/articles", articleRoute);
const articleFilePath = joinPathNames(articleDirectory, "index.mdx");

// Generate formatted MDX article file contents.
const articleMarkup = await prettier.format(
  generateMdxArticlePage({
    title,
    topic,
    date,
    description,
    pageUrl,
    readTime,
    coverImage,
    anchorLinks,
    articleContent,
  }),
  {
    parser: "mdx",
    // Don't wrap anything due to width limits, since MDX will wrap wrapped text
    // using a paragraph element, which causes unexpected markup inconsistencies.
    printWidth: Infinity,
  }
);

// Write the article to the file system.
await mkdir(articleDirectory, { recursive: true });
await writeFile(articleFilePath, articleMarkup);
Handling article metadata
In order to display snippets of published articles on the article listing page, we somehow need access to some of the article’s data, like titles, descriptions, publish dates, and so on. In the article generation script, we were already handling all that data. All we need to do is to output whatever is required into a separate meta.json file, alongside the article’s index.mdx file.
const articleMetadataPath = joinPathNames(articleDirectory, "meta.json");

/* ... */

// Create the formatted metadata contents for the current article.
const articleMetadata = await prettier.format(
  JSON.stringify({
    ...articleData,
    topic,
    description,
    readTime,
  }),
  {
    parser: "json",
    ...PRETTIER_CONFIG,
  }
);

/* ... */

// Write it to the file system.
await writeFile(articleMetadataPath, articleMetadata);
Then, with all the meta.json article files generated, we then write another script to read all the article metadata files into memory, combine and process them, and finally store the final result in a new articles.json file inside the media directory.
const ARTICLES_METADATA_FILE_PATH = "./src/media/articles.json";
const ARTICLES_DIRECTORY = "./src/routes/articles";

// Read all of the article directories into memory.
const entities = await readdir(ARTICLES_DIRECTORY, { withFileTypes: true });

const results = [];

for (const entity of entities) {
  // Article contents are held inside directories. Skip anything else.
  if (!entity.isDirectory()) {
    continue;
  }

  // Read the article's metadata JSON file into memory. This was
  // generated by the previous article generation script.
  const metadataFilePath = joinPathNames(
    ARTICLES_DIRECTORY,
    entity.name,
    "meta.json"
  );
  const metadataContents = await readFile(metadataFilePath, {
    encoding: "utf-8",
  });

  // Add the parsed metadata to the buffer.
  results.push(JSON.parse(metadataContents));
}

// Sort all of the article metadata items by publication date.
const sortedResults = results.sort((a, b) => {
  const dateA = new Date(a.date);
  const dateB = new Date(b.date);

  return dateB.getTime() - dateA.getTime();
});

// Serialize a formatted JSON file including all the metadata items.
const serializedResults = JSON.stringify(sortedResults);
const formattedResults = await prettier.format(serializedResults, {
  parser: "json",
  ...PRETTIER_CONFIG,
});

// Store it on the file system for later access.
await writeFile(ARTICLES_METADATA_FILE_PATH, formattedResults);
The contents of the generated articles.json file looks like this:
[
  {
    "title": "Why (and How) I Built The Blog You’re Reading",
    "date": "2024-01-31T00:16:00.000Z",
    "path": "why-and-how-i-built-the-blog-youre-reading",
    "topic": "Web Development",
    "description": "Outside my work for adidas, I keep myself busy by taking on various projects of interest. This blog is a prime example. While thinking about what kind of articles I want to write here, I thought to myself: what better way to kickstart it than to write an article introducing myself and stepping through how the blog itself was built?",
    "readTime": 26
  }
]
It’s just an array of article metadata items. With the articles.json file on the file system, we’re then able to import it directly into the article listing page layout.tsx module, where it’ll end up being serialized as part of the page HTML once it’s statically generated during build time.
import { component$, useStylesScoped$ } from "@builder.io/qwik";

import { ArticleSummaryList } from "~/components/articles/article-summary-list";
import { CenteredTitle } from "~/components/centered-title";

import styles from "./index.css?inline";
import articles from "../../media/articles.json";

export default component$(() => {
  useStylesScoped$(styles);

  if (!articles.length) {
    return <CenteredTitle title="Oh!" subtitle="There's nothing here yet." />;
  }

  return (
    <>
      <h1>Articles</h1>
      <ArticleSummaryList articles={articles} />
    </>
  );
});
The cool thing about this new approach, in comparison with the previous one, is that we no longer require any runtime code when serving pages. It’s completely static. The drawback, however, is that more published articles equates to an increasingly heavier JSON file. Eventually, this will become a performance bottleneck, and we’ll need to find a way to paginate the data, but that’s not something that we need to worry about for now.
Social media previews
A crucial part of writing blog articles is the ability to share links to them on different applications and Social Media platforms, like Facebook, Instagram, LinkedIn, and so on. When a link is shared somewhere, it’s important that some metadata about the page be available in such a way that the application is able to (correctly) display a preview snippet of the page’s contents.
`
---
title: ${title}
description: "${description}"
author: Daniel van Dijk
opengraph:
  - title: true
  - description: true
  - type: article
  - url: ${pageUrl}
  - article:author: Daniel van Dijk
  - article:published_time: ${date.toISOString()}
  - tag: ${topic}
  - locale: en_US
  - site_name: Daniel van Dijk
  - image: ${coverImage.url}
    image:alt: ${coverImage.alt}
    image:type: ${coverImage.type}
    image:width: ${coverImage.width}
    image:height: ${coverImage.height}
---
`;
The Frontmatter article metadata we set in generateMdxArticlePage previously does exactly that, it sets some general data in meta tags, including metadata for the commonly used Open Graph specification. I used some metadata debugging tools, like the Sharing Debugger from Facebook and the Post Inspector from LinkedIn to preview what the snippets would look like to make sure it was being set correctly.
Deployment
Since this website — including this blog — is made up entirely of “static” content, the goal is to generate all of the pages into rendered HTML as part of a build. This process is known as SSG (Static Site Generation). To enable SSG in Qwik, we can use their codemod to modify the project set up for their “static” adapter.
npm run qwik add static
This adds the following script in the package.json:
{
  "build.server": "vite build -c adapters/vite.config.ts"
}
And the following Vite extension configuration, which I edited to include the correct canonical URL for the website in the origin property:
import { staticAdapter } from "@builder.io/qwik-city/adapters/static/vite";
import { extendConfig } from "@builder.io/qwik-city/vite";

import baseConfig from "../vite.config";
import { determineOriginUrl } from "../src/utilities/url";

export default extendConfig(baseConfig, () => {
  return {
    build: {
      ssr: true,
      rollupOptions: {
        input: "@qwik-city-plan",
      },
    },
    plugins: [
      staticAdapter({
        origin: determineOriginUrl(),
      }),
    ],
  };
});
Whenever we run npm run build or npm run build.server specifically, it’ll run the adapter plugin in the Vite configuration extension, and that’ll generate the pages for us.
Starting Qwik City SSG...
dist/index.html
dist/404.html
dist/articles/index.html
dist/articles/404.html
dist/resume/index.html
dist/articles/why-and-how-i-built-the-blog-youre-reading/index.html

SSG results
- Generated: 6 pages
- Duration: 552.5 ms
- Average: 92.1 ms per page
With the adapter working as expected, the only thing left is to add a _routes.json configuration file in the public directory. This file tells Cloudflare Pages which routes to include or exclude from executing an Edge Function (a.k.a. an Edge Worker).
In this case, we want everything to be excluded since there’s no runtime code for this project. Also because handling requests through an Edge Function incurs both a performance penalty and a cost (after a certain threshold).
{
  "version": 1,
  "include": [],
  "exclude": ["/*"]
}
And that’s it! Whenever I wish to trigger a new deployment, I can either push changes to the main branch in the Git repository or use the Wrangler CLI tool.
Conclusion
Pheeew! If you’ve stuck around for the ride, then hats off to you.
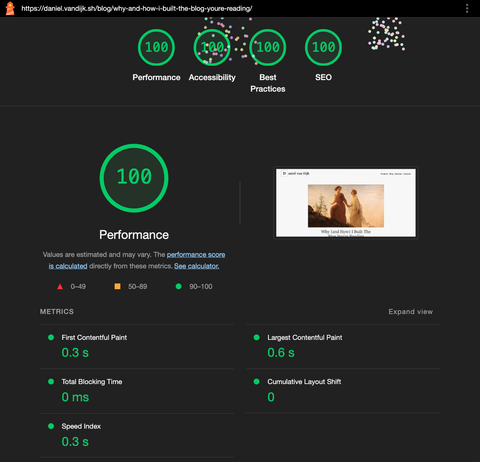
We’ve come a long way from figuring out the barebones requirements for building a blog from scratch to finally deploying the outcome of this journey to Production. The icing on the cake is a practically perfect Lighthouse performance report on this article!
Of course, there are multiple features and changes I’d still like to add in, such as adding pagination to the article listing page once there are enough articles published and moving the image processing logic into its own standalone service, but I think the current implementation will hold up just fine for the foreseeable future.
The source code for this project is available on my personal GitHub. Feel free to reach out to me on LinkedIn if you have any comments or questions. My goal is to become more active there, including posting about any new articles for this blog.